
Pioneer AVH-2550NEX Manual: A Comprehensive Guide
This manual details the Pioneer AVH-2550NEX, offering installation, setup, and operational guidance. It covers features like DVD playback and smartphone integration.
Welcome to enhanced in-car entertainment! The Pioneer AVH-2550NEX is a versatile 2-DIN touchscreen receiver designed to elevate your driving experience. This manual serves as a comprehensive guide, unlocking the full potential of your new Pioneer system. It details everything from initial setup and wiring to advanced features like AppRadio Mode and rear camera integration.
This receiver supports DVD/CD playback, USB connectivity, and seamless smartphone integration, offering a wide range of entertainment options. Understanding this manual will ensure a smooth installation process and optimal performance. It’s crucial to review the safety information before beginning installation. Resources like Manualzz provide downloadable PDF versions for convenient access.
Key Features and Specifications
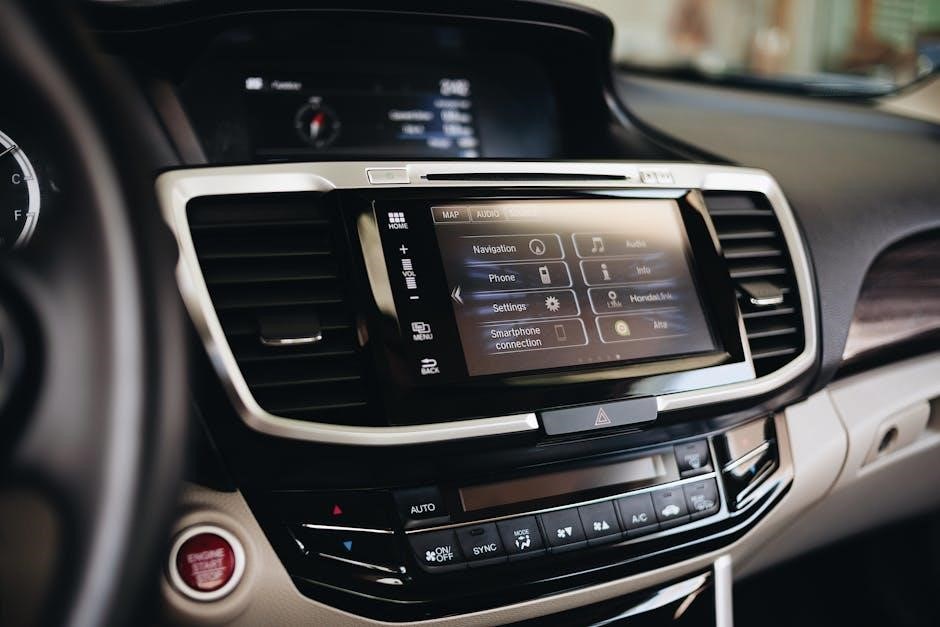
The Pioneer AVH-2550NEX boasts a suite of impressive features. It’s a 2-DIN touchscreen DVD/MP3 stereo receiver, offering versatile media playback options. Key functionalities include compatibility with both DVD and CD formats, alongside convenient USB device support. Smartphone integration via AppRadio Mode expands entertainment possibilities, while a dedicated input facilitates rear camera connectivity for enhanced safety.
This receiver also incorporates RDS (Radio Data System) functionality. Detailed specifications, including power output and supported audio/video codecs, are available in the full installation manual found on resources like Manualzz. The AVH-2550NEX is designed for a superior audio and visual experience on the road, offering a blend of convenience and performance.

Installation Guide
Proper installation ensures optimal performance. This section details unboxing, vehicle preparation, wiring, and step-by-step procedures for the AVH-2550NEX receiver.
Unboxing and Package Contents
Carefully unpack your Pioneer AVH-2550NEX and verify all components are present; The package should include the main unit itself, a remote control (with batteries), a wiring harness, a USB cable, a microphone for hands-free calling, and the installation/setup guide.
Inspect each item for any signs of damage during shipping. If anything is missing or damaged, immediately contact your retailer or Pioneer customer support. Retain the original packaging for potential returns or warranty claims. Familiarize yourself with each component before beginning the installation process. The included documentation provides a detailed list and illustrations of all parts.
Double-checking the contents now will save time and frustration later during installation.
Vehicle Preparation for Installation
Before installing the AVH-2550NEX, proper vehicle preparation is crucial. Disconnect the vehicle’s negative battery terminal to prevent electrical shorts. Gather necessary tools: screwdrivers, wire strippers, crimpers, and potentially dash removal tools specific to your vehicle model.
Consult your vehicle’s service manual for dash disassembly instructions. Carefully remove the existing factory radio, noting the wiring connections. A wiring adapter harness (sold separately) is highly recommended for a simpler, damage-free installation. Ensure sufficient space behind the dash to accommodate the AVH-2550NEX and its wiring.
Proper preparation minimizes installation time and potential vehicle damage.
Wiring Diagram Overview
The AVH-2550NEX utilizes a color-coded wiring harness for simplified connection. Key wires include the 12V constant (yellow), 12V switched (red), ground (black), and illumination (orange). Speaker wires follow a standard pattern: front left/right, rear left/right, and subwoofer output.
An RCA output provides connections for external amplifiers. The wiring diagram also details connections for the parking brake wire (required for certain features), reverse sensor input (for the rear camera), and steering wheel control interface (requires an additional adapter).
Carefully match wire colors and utilize proper crimping or soldering techniques for secure connections. Incorrect wiring can damage the unit or vehicle’s electrical system.
Step-by-Step Installation Process
Begin by disconnecting the vehicle’s negative battery terminal. Remove the factory radio using appropriate tools, consulting your vehicle’s service manual if needed. Connect the wiring harness adapter to the AVH-2550NEX, ensuring all wires are securely connected.
Mount the receiver into the dash opening using the provided brackets. Connect the antenna cable and any necessary adapters (steering wheel control, rear camera). Carefully tuck all wiring behind the dash, avoiding moving parts.
Reconnect the battery and test the unit’s functionality. Secure the dash trim and verify all features are working correctly.
Grounding and Power Connections
Proper grounding is crucial for optimal performance and to prevent noise. Connect the black ground wire securely to a clean, unpainted metal chassis point on the vehicle. Ensure the connection is free of corrosion for a reliable ground.
The red wire is the constant 12V power supply, providing memory backup. The yellow wire is the switched 12V power, activating the unit with the ignition. Verify correct polarity before connecting.
Improper connections can damage the unit or vehicle’s electrical system. Double-check all connections before restoring power, and use appropriate wire connectors for secure and lasting connections.
System Setup and Configuration
Initial setup involves language selection and touchscreen calibration for optimal use. Audio settings and Bluetooth pairing customize the experience.
Initial Power-On and Language Selection
Upon the first power-on, the AVH-2550NEX will initiate a startup sequence. The unit will prompt you to select your preferred language for the user interface. This is a crucial first step, ensuring all menus and prompts are displayed in a language you understand.
Carefully navigate through the available language options using the touchscreen. Confirm your selection, and the system will proceed to the next configuration stage. Accurate language selection streamlines the entire setup process and enhances usability. Following this, the unit may ask for region settings, impacting DVD playback compatibility. Ensure these settings align with your geographical location for optimal performance and access to region-specific content.
Touchscreen Calibration
Accurate touchscreen functionality is vital for a positive user experience. The AVH-2550NEX features a calibration process to ensure precise touch response. If you notice inaccuracies – such as selections registering slightly off-center – initiate the calibration procedure through the settings menu.
The system will display a series of targets on the screen. Precisely touch each target as prompted. This process maps the touchscreen’s input to the display, correcting any minor misalignments. Repeat the calibration if necessary, especially after significant temperature changes or vehicle vibrations. Proper calibration guarantees smooth navigation, accurate input during setup, and reliable operation of all touchscreen-controlled features. A well-calibrated screen enhances overall usability and safety.
Audio Settings and Equalization
Optimize your listening experience with the AVH-2550NEX’s comprehensive audio controls. Access these settings through the main menu to fine-tune the sound to your preferences. Adjust parameters like bass boost, fader, and balance for a customized soundstage.
The built-in equalizer allows precise frequency control, enabling you to enhance specific audio ranges. Choose from preset equalization curves (Rock, Pop, Classical, etc.) or create custom profiles. Explore advanced settings like High-Pass and Low-Pass filters to direct sound to appropriate speakers. Proper equalization ensures clear vocals, impactful bass, and balanced overall audio reproduction. Experiment with these settings to achieve optimal sound quality within your vehicle’s acoustics.
Bluetooth Pairing and Connectivity
Seamlessly connect your smartphone to the AVH-2550NEX via Bluetooth for hands-free calling and audio streaming. Initiate pairing mode within the Bluetooth settings menu on the receiver. Ensure your smartphone’s Bluetooth is enabled and discoverable.
Once detected, select your device from the list and confirm the pairing request. You may be prompted to enter a PIN code (typically ‘0000’). After successful pairing, the unit can automatically connect upon entering your vehicle. Bluetooth allows wireless music playback, podcast access, and convenient call management. The system supports multiple paired devices, but only one can be actively connected at a time. Explore Bluetooth profiles for optimal functionality.

Functionality and Operation
Explore diverse media options: DVD/CD playback, USB device compatibility, smartphone integration via AppRadio, and convenient rear camera viewing are all supported.
DVD/CD Playback
Enjoy your favorite physical media with the AVH-2550NEX’s integrated DVD/CD player. This unit supports a wide range of disc formats, delivering high-quality audio and video playback directly to the touchscreen display. Ensure discs are clean and properly inserted for optimal performance. The system offers standard playback controls – play, pause, stop, fast forward, rewind, and track/chapter selection – easily accessible through the intuitive touchscreen interface.
Furthermore, the unit supports MP3, WMA, and AAC audio files burned onto CDs, allowing for extensive music libraries to be enjoyed on the go. Video playback supports various formats, enhancing the in-car entertainment experience. Refer to the full manual for a complete list of compatible disc and file types. Proper disc handling is crucial to avoid damage to the player.
USB Device Compatibility
The Pioneer AVH-2550NEX offers versatile connectivity through its USB port. This allows playback of audio and video files stored on USB mass storage devices. Supported audio formats include MP3, WMA, AAC, and WAV, while video playback supports formats like MPEG-1, MPEG-2, and AVI. Ensure your USB device is formatted with a compatible file system (FAT16/FAT32) for seamless recognition.
The unit can also charge compatible smartphones and other devices via the USB connection. Maximum current output may vary; consult the specifications for details. For optimal performance, use a high-quality USB cable and avoid using excessively long cables. The system supports browsing through folders and playlists directly on the touchscreen, providing convenient access to your digital media library.
Smartphone Integration (AppRadio Mode)
The AVH-2550NEX features AppRadio Mode, expanding functionality through compatible smartphones. This allows access to apps directly on the receiver’s touchscreen, offering features like navigation, music streaming, and more. Compatibility varies by smartphone model and app; check Pioneer’s website for the latest supported apps and devices.
Connection is typically established via USB, requiring the installation of the AppRadio app on your smartphone. Once connected, follow the on-screen prompts to launch and control compatible apps. Ensure your smartphone is fully charged or connected to a power source for extended use; AppRadio Mode enhances in-car entertainment and convenience, providing a safer and more integrated driving experience.
Rear Camera Integration
The AVH-2550NEX supports rear camera integration, enhancing safety and convenience while reversing. A compatible rear camera connects to the receiver, automatically displaying the camera’s view when the vehicle is shifted into reverse. This provides a wider field of vision and helps identify potential obstacles.
Installation typically involves running a video cable from the camera to the receiver. Ensure proper wiring and secure connections for optimal performance. The receiver’s settings allow for camera angle adjustment and guide line display customization. Refer to the camera manufacturer’s instructions for specific installation details. A properly installed rear camera significantly improves driver awareness and reduces the risk of accidents.
Troubleshooting Common Issues
This section addresses frequent problems with the AVH-2550NEX, including power failures, sound issues, Bluetooth connectivity, and touchscreen responsiveness concerns.
No Power to the Unit
If your Pioneer AVH-2550NEX fails to power on, begin by verifying the main power supply connection – ensure the red wire is securely connected to the vehicle’s ignition or battery positive terminal. Check the fuse associated with the unit; a blown fuse is a common culprit. Locate the fuse box (typically under the dash or hood) and inspect the fuse designated for the radio.
Confirm the ground connection (black wire) is firmly attached to a clean, unpainted metal surface on the vehicle’s chassis. A loose or corroded ground can prevent power-up. Additionally, test the vehicle’s battery voltage to ensure it’s within the acceptable range (typically 12-14.4V). If these steps don’t resolve the issue, consult a professional installer.
Sound Problems and Solutions
Experiencing audio issues with your AVH-2550NEX? First, verify the volume is appropriately adjusted and not muted. Check the fader and balance settings within the audio menu to ensure sound isn’t directed solely to one speaker. Confirm the speaker wires are securely connected to both the head unit and the speakers themselves.
Inspect the vehicle’s speaker system for any damage or shorts. If using external amplifiers, ensure they are powered on and their input/output connections are correct. Explore the audio settings, including equalization (EQ) and loudness, to optimize sound quality. If problems persist, a factory reset of the head unit might resolve software-related glitches.
Bluetooth Connection Failures
Troubleshooting Bluetooth connectivity on your AVH-2550NEX? Begin by ensuring Bluetooth is enabled on both your smartphone and the head unit. Verify the device is within range – typically within 30 feet. Delete any previously paired devices from both the head unit’s Bluetooth memory and your smartphone’s list, then re-pair them.
Confirm your smartphone’s Bluetooth discovery mode is active. If pairing fails repeatedly, try restarting both devices. Check for software updates for both the AVH-2550NEX and your smartphone, as outdated software can cause compatibility issues. Interference from other wireless devices may also disrupt the connection; move away from potential sources.
Touchscreen Responsiveness Issues
Experiencing unresponsive touchscreen behavior on your AVH-2550NEX? First, ensure the screen is clean and free of smudges or debris. A soft, dry cloth is recommended for cleaning. Recalibrate the touchscreen through the unit’s settings menu; this often resolves minor inaccuracies. Check for any physical obstructions near the screen that might interfere with touch detection.
If the issue persists, a system reset might be necessary. Consult the manual for instructions on performing a factory reset, noting this will erase saved settings. Ensure the unit’s firmware is up-to-date, as updates frequently address touchscreen performance. Extreme temperatures can also affect responsiveness; avoid prolonged exposure to direct sunlight.
Safety Information and Warnings
Prioritize safety during installation and operation. Heed all warnings, especially regarding rear visibility systems and potential distractions while driving.
Important Safety Precautions
Before installing or operating the Pioneer AVH-2550NEX, carefully review these crucial safety precautions. Improper installation can compromise vehicle safety systems. Always disconnect the vehicle’s negative battery terminal to prevent electrical shock or short circuits during wiring.
Avoid installing the unit where it could obstruct the driver’s view or interfere with vehicle controls. Do not attempt to operate or adjust the unit while driving; this could lead to a dangerous distraction. Ensure all wiring is securely connected and properly insulated to prevent fire hazards.
Pay close attention to the rear visibility system notes, as improper camera installation can affect safety. If you are unsure about any aspect of the installation or operation, consult a qualified professional.
Rear Visibility System Notes
The Pioneer AVH-2550NEX supports rear camera integration, enhancing driver awareness. However, it’s vital to understand limitations. This system is a driver aid, not a substitute for careful observation. Always visually confirm surroundings before and while reversing.
Ensure the camera lens is clean and unobstructed for optimal visibility. Proper camera installation is crucial; incorrect wiring or mounting can lead to a distorted or non-functional image. Refer to the installation guide for specific wiring instructions.
Be aware that image quality can be affected by lighting conditions and weather. Regularly inspect the camera and wiring for damage. A malfunctioning rear camera should be repaired immediately to maintain vehicle safety.